Ok, Pie Week turned into Pie Weeks. I had a few too many recipes to share and not enough time to post over the weekend. So a few more delicious pie recipes are going to be coming your way this week!
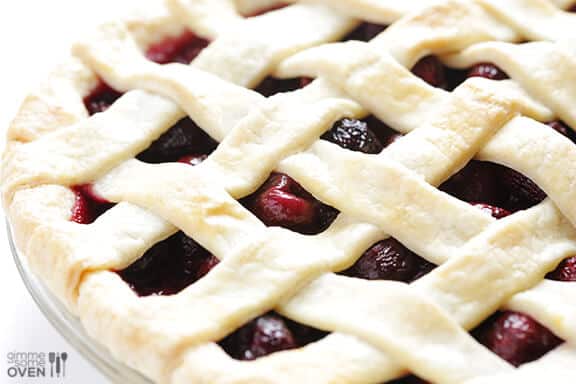
But first, another tutorial — How To Make A Lattice Pie Crust!
We covered most of the basics about mixing up pie dough and standard double crusts in our step-by-step How To Make A Pie Crust tutorial. But I think that lattice crusts deserve their own special section. Although there’s not too much to say, because lattice crusts are surprisingly much easier than I expected to make! Once you have the strips of dough cut out, it really just takes a minute or two to lay out the pattern, and then pinch the edges together to make your crust.
I promise. You should give it a try!
How To Make A Lattice Pie Crust | 1-Minute Video
This post contains affiliate links.
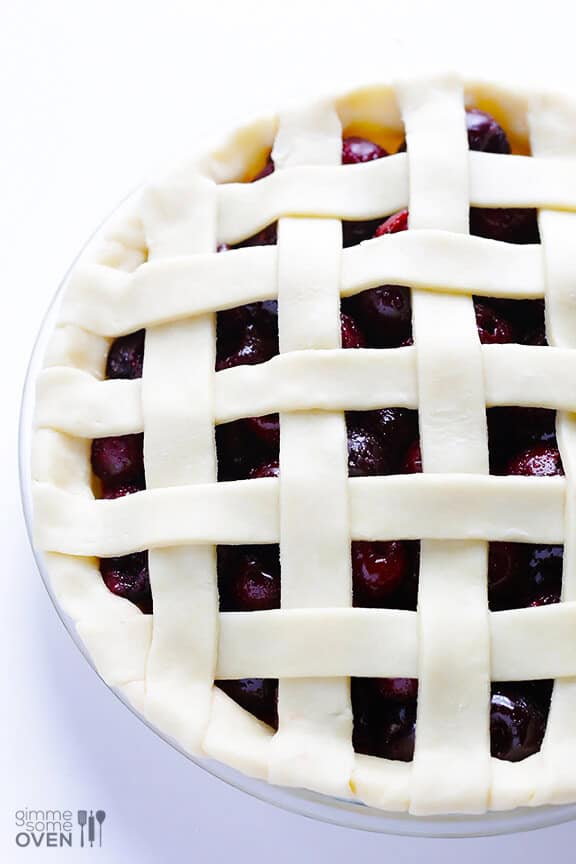
How To Make A Lattice Pie Crust
A Step-By-Step Tutorial! Plus, see extra tips below:
Tools For Cutting Pie Dough Strips
- Pastry Wheel – If you want to invest an extra $8, you can buy a pastry and ravioli wheel which will give your pie dough strips some options for different edges — straight or scalloped
- Pizza Wheel/Cutter – Or you can do like I did and just use a standard pizza cutter. Either work!
- Pastry Brush – Ok, this is not for cutting the pie dough strips. But if you want to brush them with milk and sprinkle with sugar before baking, your strips will be extra golden and sugary!
Width & Amount Of Strips
- This is totally up to you. I used a total of 10 strips that were about 3/4-inch wide, but you can use more or less and make them wider or thinner if desired.
Temperature Of Strips
- As we discussed in the tutorial for How To Make Pie Crust, chilled dough always works better. So be sure not to let the dough get too warm from sitting out or being handled by your (warm) fingers. I typically pop mine back in the freezer for 10 minutes before baking after I have woven the lattice crust.
Don’t Worry About Perfection!
- Even if you weave the most beautiful pie crust, they typically shift around a bit during baking. And usually you want the juices in the filling (if it’s fruit) to get nice and bubbly, so they may spill over onto your crust. This is ok!!! And better than that — it’s delicious!!! So make a pretty weave and then enjoy breaking it up with your spoon for every tasty bite. :)
Be sure to check out some of these delicious pie recipes too!


 Recipe | gimmesomeoven.com")
French Silk Pie (Chocolate Pie) Recipe


Disclaimer: This post contains affiliate links.
Oh my gosh that is such a gorgeous pie!! Love the step by step photos, so helpful!!
“Don’t worry about perfection!” Says the one with the perfect lattice top! Seriously, beautiful crust and awesome tutorial. I look forward to making my next pie.
Awesome tutorial, as always, Ali! You make lattice look so easy.
Wonderful informative post on this pie crust! I enjoy making pie crusts a lot and your pictures and post are amazing!
LIFE SAVOR!!!! Oh my goodness. I never make pies for fear of the lattice! Thank you for an amazeballs tutorial!
This “How To” is so very helpful! I love the simplicity of your photographs.
I love Pie Weeks! We need more of them.
your posts always rock. I don’t know how you do all of this formatting, tutprials etc, and I know that’s silly of me, but I wish I could be your intern and learn it all!
Pie crusts really intimidate me. My mom makes such beautiful, tender, delicious crusts. I’m pinning this to use next time I feel brave enough to attempt one.
Absolutely gorgeous! I’ve always wanted to try a lattice pie… maybe I will now. You’ve made it look so easy!