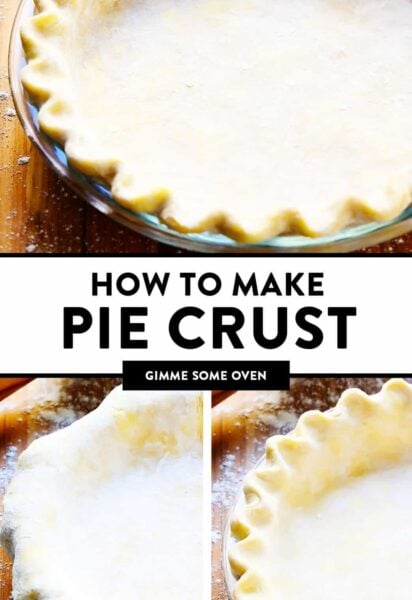
A step-by-step photo tutorial for how to make a pie crust — either 100% by hand or with the help of a food processor — featuring my favorite all-butter homemade pie crust recipe.

I hope that your holiday baking seasons are off to a delicious start! I have two new (naturally-sweetened) pie recipes coming your way later this week that I’m pretty excited about. But before we get to those, I thought it might be helpful to go back to the basics today with a quick refresher on how to make pie crust…
…featuring my go-to, all-butter, perfectly-flaky, easy-to-make, always-delicious homemade pie crust recipe. ♡
As someone who used to be 100% intimidated by the art of making pie crust from scratch, I’m here today to assure you that homemade pie crust is genuinely much simpler than you might think! All you need are 5 easy ingredients to make pie crust — flour, butter, salt, sugar (optional) and ice water — plus about 15 minutes of active prep time if you would like to make this recipe completely by hand. (Or less than 10 if you happen to own a food processor, which makes this recipe even easier.) Then after just a few simple steps, the most delicious, golden, buttery, flaky homemade pie crust will be ready to bake up in no time.
I initially shared this classic pie crust recipe here on the blog six years ago when I was first venturing into the world of pie crust baking. But now, dozens and dozens of pies later, I’m back today with a big update on this post, including some of the best tips and tricks I’ve learned in these past few years of pie baking, plus new step-by-step photos for how to make this recipe either with a food processor or completely by hand. So whether this is your very first time making pie crust or your fiftieth, my hope is that there will be a little something helpful here for everyone today, and that this recipe might make your holiday season all the more delicious and bright.
Alright, grab your rolling pins and let’s make some homemade pie crust!


Pie Crust Ingredients:
Alright, before we get to the recipe, let’s start with some ingredient notes. To make this homemade pie crust recipe, you will need these 5 simple ingredients:
- All-purpose flour: We’re going classic with regular all-purpose flour here. I highly recommend using a kitchen scale to accurately measure the flour, if you have one. If not, just remember to scoop the flour with a spoon into your measuring cup and level it off with a knife, rather than scooping your measuring cup into the bag of flour itself (to prevent over-packing your measuring cup).
- Sugar (optional): I like to add about a tablespoon of sugar to my pie crust recipe for a hint of sweetness. But you are welcome to leave this out if you would like an unsweetened pie crust.
- Salt: To bring out the flavor of the pie dough.
- Cold unsalted butter: Which we will roughly dice into 1/4-inch cubes, so that the butter can be mixed into the dry ingredients more easily and evenly. Also, you want the butter to be completely chilled when it is added to the recipe. So I recommend adding the butter to the dry ingredient mixture immediately after it has been diced.
- Ice water: It’s also important that your ice water be as cold as possible when it is added to the dough. I typically keep a cup of ice water near my baking station all ready to go, then strain the cold water into a measuring cup seconds before adding it to the dough. Some people also like to use a 50/50 mixture of ice water and frozen vodka to ensure that the liquid is as chilled as possible, which you are welcome to do if you would like. (I’ve experimented with both methods over the years, but honestly can’t tell that big of a difference with the vodka trick, so I usually just stick with ice water.)
Pie Crust Equipment:
To make homemade pie crust, you will also need the following tools:
- Food processor or pastry cutter or two forks: If you happen to own a food processor, it makes cutting the butter into the flour a breeze. If not, no worries, you can also easily do so by hand with either a pastry cutter or with two forks. (See instructions for all methods below.)
- Mixing bowl: You will need a large mixing bowl (I recommend either a glass mixing bowl or a stainless steel mixing bowl) to mix the ice water into the dough.
- Rolling pin: Either a standard rolling pin (ideally at least 12 inches long) or a flat rolling pin. I find that this marble rolling pin works especially well with this recipe, as the cool marble has the added bonus of keeping the dough nice and chilled while rolling.
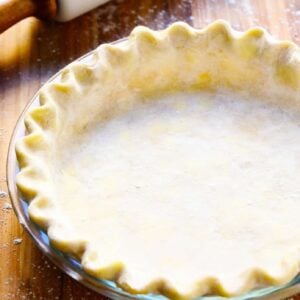
- Glass pie plate: I like baking pies in glass pie plates because they conduct heat much more evenly than ceramic or metal pie plates. But that said, any pie plate that you own will do. ♡
- Pastry brush (optional): Which you can use to brush the crust with an egg wash before baking, if you would like your crust to be nice and golden.
- Kitchen scale (optional): Which I highly recommend to weigh your ingredients (especially the flour) for accurate measuring.
- Pie crust shield (optional): Which can help to prevent the edges of your crust from burning in the oven, especially for recipes that require a longer baking time. (Alternately, you can just use a strip of aluminum foil to gently cover the edges of the crust.)
- Pie weights or dried beans (for blind baking): Which you will need if your recipe requires that you blind-bake the pie crust, in order to prevent the center of the crust from rising as it bakes. I prefer using pie weights, but a bag of dried uncooked beans will also work as a substitute. You will also need to place a sheet of parchment or foil between the pie crust and the weights, in order to prevent them from sticking. (See instructions below.)


How To Make Pie Crust:
Full detailed steps for how to make pie crust by hand or in a food processor are detailed in the recipe box below. But in a nutshell, you will simply need to…
- Mix the dry ingredients. Either whisked together in a mixing bowl, or pulsed together in a food processor.
- Cut the butter into the dry ingredients: (This is just baking lingo for mixing cold butter into flour.) You can either do this step by hand using a pastry cutter or two forks, or you can do it in a food processor with a few brief pulses. Cut the butter into the dry ingredients until it forms roughly pea-sized clumps. (It’s ok to see some clumps!)
- Add water: While the butter is still nice and cold, use a spatula to quickly mix the ice water into the dough until it is evenly combined and the dough begins to form moist clumps. (If the dough is not sticking together, you can add 1 or 2 more tablespoons of water to help it clump.) Be careful not to overmix the dough during this step of the process; you don’t want to overwork the gluten.
- Form a dough ball: Using your hands, quickly pack the dough into a ball (like you’re packing a snowball) and then flatten it into an even disk.
- Wrap and chill the dough: Wrap the dough disk tightly in plastic wrap and refrigerate it for at least 1 hour, or up to 3 days. Then it will be ready to use!


Important Pie Crust Tips (Please Read!):
- Above all — keep everything as chilled as possible! In order to prevent your pie crust from shrinking and hardening and losing that precious flakiness, it’s super important that you try to keep all of your ingredients as chilled as possible when making pie crust. This includes making sure that you use ice water and fresh-outta-the-fridge chilled butter. And also that you try to avoid letting the ingredients/dough sit out for too long, and that you also avoid working the dough too much with your warm hands. Basically when it comes to pie crust, the chillier you can keep the dough, the better!
- Measure your ingredients accurately. As I mentioned above, I super-recommend using a kitchen scale in order to measure your ingredients accurately (especially the flour). It’s easy to accidentally add too much flour if you are scooping it into a measuring cup by hand. And for anyone living outside of the United States, where butter is usually sold in larger blocks instead of sticks, it’s essential to measure your butter accurately too.
- Don’t overwork the dough. It’s also important to avoid overworking (over-mixing) the dough, especially during the steps when you are adding in the water, forming the dough into a disk, and eventually, when you are rolling it out on a cutting board.
- Don’t skip the resting/chilling times. These are essential parts of this recipe. The gluten in the dough needs time to rest (and/or chill) in between certain steps. Otherwise, the pie crust will shrink once it bakes in the oven.
- Don’t stretch the dough. When you reach the process of rolling out and transferring the dough into a pie plate, try to avoid pulling or stretching the dough to create your desired shape. If you have a hole or need to extend the edges on one side, it is better to cut off and press some excess dough into that spot, versus trying to stretch the dough.
Favorite Pie Recipes:
Stay tuned for two new pie recipes coming to the blog later this week! In the meantime, here are a few more of my faves:
Homemade Pie Crust
Ingredients
- 1 1/4 cups (150 grams) all-purpose flour
- 2 teaspoons granulated sugar (optional)
- 1/2 teaspoon salt
- 1/2 cup (115 grams) cold unsalted butter*, diced into 1/4-inch cubes
- 1/4 cup ice water
Instructions
- Mix the dry ingredients: Combine the flour, sugar (optional) and salt in a large mixing bowl or a food processor. Whisk or pulse briefly until combined.
- Cut the butter into the dry ingredients: Sprinkle the diced butter evenly over the dry ingredient mixture. If working by hand, use a pastry cutter or two forks to cut the butter into the dry ingredients until the butter is evenly dispersed into pea-sized (or smaller) bits. If using a food processor, briefly pulse the butter and dry ingredients together 5 to 7 times until the butter is evenly dispersed into pea-sized (or smaller) bits, then transfer the mixture to a large mixing bowl.
- Add water: Sprinkle the dough evenly with the ice water. Use a spatula to quickly mix the water into the dough until it is evenly combined, and the dough begins to form moist clumps. (If the dough is not sticking together, you can add 1 or 2 more tablespoons of water to help it clump.) Try not to overmix the dough.
- Form a dough ball: Using your hands, quickly pack the dough into a ball (like you’re packing a snowball). Then flatten the ball into a 3/4-inch thick disk.
- Wrap and chill the dough: Wrap the dough disk tightly in plastic wrap, then refrigerate for at least 1 hour, or up to 3 days, until ready to roll out and use.
Notes
This post contains affiliate links.

took way more time than my old pie crust recipe, but worth it. you just have to keep this in mind when you are planning on baking. that should be mentioned.
I’ve never been disappointed with your recipes and I always look for you when searching for a recipe!
I need you to know that this recipe turned me into an obsessed pie baker! I was awful at pie crust until something about the way you wrote this recipe made it click for me. Now it comes out pretty much perfectly every time, and I’m never scared during the process. Thank you thank you thank you!
This is my go to pie crust recipe, always delicious. Thanks
What makes the pie ingredients get under the crust during baking?
Just made this recipe and now I’m noshing on left over baked strips of the pie dough (sprinkled with cinnamon before baking). What a great recipe — so flaky and tasty! Thanks so much.
Better yet is to use finely rendered lard, none can compare
I’m definitely afraid of making pies, but you’ve convinced me to try this year. I hope one of the new pie recipes is that vegan pumpkin pie you showed on Instagram. I love pumpkin pie, but I’m allergic to eggs, so I need to find a good vegan version so I can eat some too this year.
Ali, I can’t thank you enough for your clear and detailed instructions on how to make a butter pie crust! I have lived in the US for 50 years, fell in love with Thanksgiving and pumpkin pie in my first year here and have tried to make a butter pie crust every year since, only to wind up with a shrunken cardboard-like disk each time. Followed all kinds of “easy” directions too! This year I came across gimmesomeoven and was immediately reassured by your own admittance of several failures before you got the hang of butter-pie-crust making. I read everything you wrote about shrinking crusts and how tricky (but tasty!) it is to work with butter. Then I followed your recipe and directions to the letter, including your equipment recommendations. First crust was good but not baked all the way through, which I blamed on my oven. Second crust: VICTORY!!! (I gave that one an extra 2 minutes in my oven.) Flaky, tasty, prebaked crust with an edge that stayed on the rim of the pie pan. Rave comments from my family. And from the dog, who licked up the final crumbs. Thank you, thank you, thank you!
thank u so much but i want to asking you what can use flour instead unbleached flour?
We just used unbleached all purpose flour (you don’t have to get the unbleached kind if you don’t want/can’t find it). We hope you enjoy!