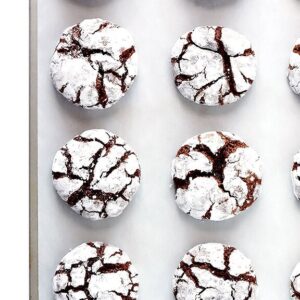
This classic Chocolate Crinkle Cookies recipe is fun to make, super delicious, and perfect for the holidays!
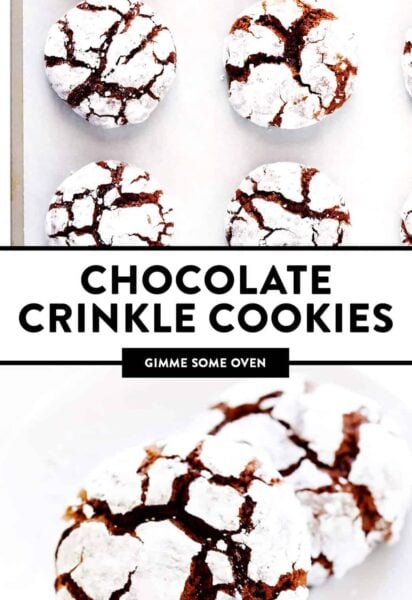
 is easy to make, perfectly fudgy, and dusted with powdered sugar. A classic dessert for Christmas and holiday baking! | gimmesomeoven.com")
Of course, our week of classic holiday cookie recipes here on the blog would not be complete without these famous crinkles.
Who wants some Chocolate Crinkle Cookies??
Whether you’re baking up a batch for a cookie exchange, pulling them warm outta the oven for a holiday party, or leave them out with a note for Santa, I promise that these chocolate crinkle cookies are always a hit! And this specific recipe has served me well for years. The cookie batter itself is very straightforward, and quick and easy to whip up. Then once you’ve rolled the dough balls in powdered sugar, channel those Great British Baking Show vibes and plant yourself in front of the oven to watch the cookies rise and crinkle. So fun! (Especially with kiddos!)
Here’s how to make them!
Chocolate Crinkle Cookies | 1-Minute Video
 is easy to make and perfectly fudgy and dusted with powdered sugar. A classic dessert for Christmas and the holidays! | gimmesomeoven.com #chocolate #crinkle #cookies #dessert #christmas #holiday #baking")
Chocolate Crinkle Cookie Ingredients:
There’s a good chance you may already have these ingredients in your pantry! You will need:
- Flour: I typically use all-purpose, but white whole wheat flour would work too.
- Unsweetened cocoa powder: Because…chocolate.
- Baking powder, salt, sugar, eggs, vanilla extract: Because…cookies.
- Oil: I grew up making these with vegetable oil, but any mild-flavored oil will do.
- Powdered sugar: For rolling the cookie dough.
 is easy to make and perfectly fudgy and dusted with powdered sugar. A classic dessert for Christmas and the holidays! | gimmesomeoven.com #chocolate #crinkle #cookies #dessert #christmas #holiday #baking")
How To Make Chocolate Crinkle Cookies:
To make crinkle cookies, simply…
- Whisk together your dry ingredients. Flour, cocoa powder, baking powder and salt.
- Prep your dough. In the bowl of a stand mixer, cream together the sugar and oil. Followed by adding in the eggs and vanilla, followed by the dry ingredients.
- Chill the dough. Sorry, you really can’t skip this step with chocolate crinkle cookies! Wrap the dough tightly in plastic wrap and refrigerate for at least 2 hours, or until completely chilled.
- Prep your dough balls. Form the dough into 1-inch balls, and roll them in powdered sugar until completely coated. Place them on a parchment-covered baking sheet.
- Bake. Then bake then at 350°F for about 10 minutes. Let the cookies cool for a bit afterwards. Then…
- Enjoy! I highly recommend eating these warm out of the oven. But they also store well for up to 5 days, or freeze well for up to 3 months.
 is easy to make and perfectly fudgy and dusted with powdered sugar. A classic dessert for Christmas and the holidays! | gimmesomeoven.com #chocolate #crinkle #cookies #dessert #christmas #holiday #baking")
Possible Variations:
Looking to mix things up? Feel free to:
- Add chocolate chips. I really love mixing 1 cup of semisweet chocolate chips into this batter for that extra-gooey chocolate touch.
- Place a Hershey’s kiss on top. Just poke the kisses right into the tops of the cookies immediately after they come out of the oven.
- Hide a caramel inside the cookie. Once your dough ball is ready to go, poke half of a soft caramel inside the dough, and wrap/roll the dough around the caramel so that it is completely enclosed. The caramel will melt while baking, making for an extra delicious surprise inside.
- Add ground cinnamon and cayenne. For a Mexican chocolate twist, try adding 1/2 teaspoon ground cinnamon and a pinch of cayenne pepper to the dough. (Just whisk them into the dry ingredient mixture.)
 is easy to make and perfectly fudgy and dusted with powdered sugar. A classic dessert for Christmas and the holidays! | gimmesomeoven.com #chocolate #crinkle #cookies #dessert #christmas #holiday #baking")
More Favorite Cookie Recipes:
Looking for more delicious cookie inspiration? Feel free to check out our full collection of cookie recipes, or any of these other favorite classic cookies:
- Chocolate Chip Cookies
- Chocolate Chocolate Chip Cookies
- Peanut Butter Cookies
- Gingerbread Cookies
- No-Bake Cookies
- Brown Sugar Cookies
- Chewy Ginger Molasses Cookies
Chocolate Crinkle Cookies
Ingredients
- 1 cup all-purpose flour
- 1/2 cup unsweetened cocoa powder
- 1 teaspoon baking powder
- 1/4 teaspoon salt
- 3/4 cup granulated sugar
- 1/4 cup mild-flavored oil (such as vegetable oil, coconut oil, olive oil, etc.)
- 2 large eggs
- 1 teaspoon vanilla extract
- 1 cup powdered sugar, for coating the cookies
Instructions
- In a medium bowl, whisk together the flour, cocoa powder, baking powder and salt until combined. Set aside.
- In the bowl of a stand mixer, add the granulated sugar and oil. Beat on medium-high speed for 2 minutes, or until the mixture is light and fluffy. Add in the eggs and vanilla, beating on medium-low speed until combined. Then gradually fold in the flour mixture, and beat on medium-low speed until combined.
- Form the dough into a large ball, and place it on a large sheet of plastic wrap. Wrap the plastic around it so that it is sealed tightly. Refrigerate for at least 2 hours (or up to 24 hours) until the dough is chilled completely through.
- Once you’re ready to bake the cookies, preheat the oven to 350°F. Line a large cookie sheet with parchment paper. Fill a small bowl with the powdered sugar.
- Remove and unwrap the dough. Then form the dough into 1-inch round balls. Dip each dough ball in the powdered sugar until it is completely covered on all sides, and then place them least 2 inches apart on the prepared baking sheet.
- Bake for 10 minutes. Then remove the baking sheet from the oven, and let the cookies cool on the baking sheet for 3 minutes. Transfer the cookies to a wire rack, and let them cool until they reach room temperature.
- Serve immediately, or store in a sealed container for up to 5 days, or freeze for up to 3 months.

I was wondering can I used sweetened cocoa powder instead? That’s what I have on hand but will I need to adjust any sugars to help balance out the sweetened cocoa? Thanks cookies look great
Hi Liz! Unfortunately we wouldn’t recommend using sweetened cocoa powder for this, especially since we’ve never tried it wand wouldn’t know how to advise you on the amount of sugar you’d need to cut back on in the recipe.
These are one of our favorited, although we put cherry and peppermint kisses in the middle after baking….yummy!
We’re so glad you love them and the cherry and peppermint kisses sound like a great addition!
Never mind, just saw that it makes 20-22 cookies. :)
Making them tonight for tomorrow.
Awesome, we hope you enjoyed them, Cristina!
With even less than a week to Christmas, I made these today with my 4 year old daughter! ? They will certainly not last until Christmas!! ? They turned out yummy and lovely looking, and I took a dozen to share with my crochet group ladies tonight! They loved them too. We got 30 good-sized cookies from the recipe. It’s certainly one to keep, thank you for sharing it! ?
Thanks for sharing, Mari — we’re so glad these were a hit! :)
Just made these and followed the recipe exactly (I chose to add chic chips) like some others, my dough was very sticky, almost a batter. I scooped it into a plastic-wrap lined bowl and shaped it into a disc to go into the fridge. Coating my hands in powdered sugar helped roll these guys into balls. I really coated my second batch with the sugar and they turned out much prettier. Taste great too!
Yes, refrigerating the dough definitely helps, as this is a stickier cookie dough. We’re glad they worked out for you and that you enjoyed them!
These look so delicious that I had to try! Dough is currently in the refrigerator. It is definitely very sticky and did not form a ball but what I’ve seen from other commenters is they still come out delicious. Hoping mine turn out ok.
Also found the dough sticky and could not for ball. I triple checked my measurements. I’m sure they’ll be yummy once done though!-2 hours away! :)
It helps to chill the dough, so we strongly recommend that (should be much easier to work with afterwards). :) We hope you enjoy these!
Hi, I had the same issue as some of the other commenters. I did the measurements exactly and the dough is more like pouring gooey wet batter onto plastic wrap – not able to form into a ball at all. I didn’t use any substitutes either, not sure what happened?
Hi Laura — oh no, we’re so sorry! Could one of your ingredient measurements be off? How long did you chill the dough for? It sounds like it may have needed to chill longer (that definitely makes it easier to work with).
Made these for my husband to take to work for him all of his coworkers to enjoy. (He’s a UPS driver) He came home that night and told me everyone was obsessed with them! Yay! I only got to have one, but it was seriously SO good! Followed the recipe exact. Will definitely be saving this recipe! Thank you!
Yay, so glad you both enjoyed them!!
These are a favorite cookie of mine so I decided to make them myself with this recipe. Be warned: These cookies are SO STICKY! When I attempted to wrap these in plastic wrap, it was nearly impossible and I felt like someone had played a bad prank on me:( I would suggest keeping the dough in the bowl and covering the bowls to refrigerate rather than using the plastic wrap and losing most of the dough.
We’re sorry to hear you ended up with such sticky dough, Kristasista! :( The dough should not be that sticky. We wonder if one of your measurements could have been off?