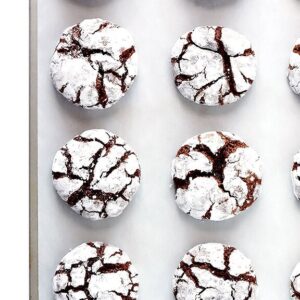
This classic Chocolate Crinkle Cookies recipe is fun to make, super delicious, and perfect for the holidays!
 is easy to make, perfectly fudgy, and dusted with powdered sugar. A classic dessert for Christmas and holiday baking! | gimmesomeoven.com")
Of course, our week of classic holiday cookie recipes here on the blog would not be complete without these famous crinkles.
Who wants some Chocolate Crinkle Cookies??
Whether you’re baking up a batch for a cookie exchange, pulling them warm outta the oven for a holiday party, or leave them out with a note for Santa, I promise that these chocolate crinkle cookies are always a hit! And this specific recipe has served me well for years. The cookie batter itself is very straightforward, and quick and easy to whip up. Then once you’ve rolled the dough balls in powdered sugar, channel those Great British Baking Show vibes and plant yourself in front of the oven to watch the cookies rise and crinkle. So fun! (Especially with kiddos!)
Here’s how to make them!
Chocolate Crinkle Cookies | 1-Minute Video
 is easy to make and perfectly fudgy and dusted with powdered sugar. A classic dessert for Christmas and the holidays! | gimmesomeoven.com #chocolate #crinkle #cookies #dessert #christmas #holiday #baking")
Chocolate Crinkle Cookie Ingredients:
There’s a good chance you may already have these ingredients in your pantry! You will need:
- Flour: I typically use all-purpose, but white whole wheat flour would work too.
- Unsweetened cocoa powder: Because…chocolate.
- Baking powder, salt, sugar, eggs, vanilla extract: Because…cookies.
- Oil: I grew up making these with vegetable oil, but any mild-flavored oil will do.
- Powdered sugar: For rolling the cookie dough.
 is easy to make and perfectly fudgy and dusted with powdered sugar. A classic dessert for Christmas and the holidays! | gimmesomeoven.com #chocolate #crinkle #cookies #dessert #christmas #holiday #baking")
How To Make Chocolate Crinkle Cookies:
To make crinkle cookies, simply…
- Whisk together your dry ingredients. Flour, cocoa powder, baking powder and salt.
- Prep your dough. In the bowl of a stand mixer, cream together the sugar and oil. Followed by adding in the eggs and vanilla, followed by the dry ingredients.
- Chill the dough. Sorry, you really can’t skip this step with chocolate crinkle cookies! Wrap the dough tightly in plastic wrap and refrigerate for at least 2 hours, or until completely chilled.
- Prep your dough balls. Form the dough into 1-inch balls, and roll them in powdered sugar until completely coated. Place them on a parchment-covered baking sheet.
- Bake. Then bake then at 350°F for about 10 minutes. Let the cookies cool for a bit afterwards. Then…
- Enjoy! I highly recommend eating these warm out of the oven. But they also store well for up to 5 days, or freeze well for up to 3 months.
 is easy to make and perfectly fudgy and dusted with powdered sugar. A classic dessert for Christmas and the holidays! | gimmesomeoven.com #chocolate #crinkle #cookies #dessert #christmas #holiday #baking")
Possible Variations:
Looking to mix things up? Feel free to:
- Add chocolate chips. I really love mixing 1 cup of semisweet chocolate chips into this batter for that extra-gooey chocolate touch.
- Place a Hershey’s kiss on top. Just poke the kisses right into the tops of the cookies immediately after they come out of the oven.
- Hide a caramel inside the cookie. Once your dough ball is ready to go, poke half of a soft caramel inside the dough, and wrap/roll the dough around the caramel so that it is completely enclosed. The caramel will melt while baking, making for an extra delicious surprise inside.
- Add ground cinnamon and cayenne. For a Mexican chocolate twist, try adding 1/2 teaspoon ground cinnamon and a pinch of cayenne pepper to the dough. (Just whisk them into the dry ingredient mixture.)
 is easy to make and perfectly fudgy and dusted with powdered sugar. A classic dessert for Christmas and the holidays! | gimmesomeoven.com #chocolate #crinkle #cookies #dessert #christmas #holiday #baking")
More Favorite Cookie Recipes:
Looking for more delicious cookie inspiration? Feel free to check out our full collection of cookie recipes, or any of these other favorite classic cookies:
- Chocolate Chip Cookies
- Chocolate Chocolate Chip Cookies
- Peanut Butter Cookies
- Gingerbread Cookies
- No-Bake Cookies
- Brown Sugar Cookies
- Chewy Ginger Molasses Cookies
Chocolate Crinkle Cookies
Ingredients
- 1 cup all-purpose flour
- 1/2 cup unsweetened cocoa powder
- 1 teaspoon baking powder
- 1/4 teaspoon salt
- 3/4 cup granulated sugar
- 1/4 cup mild-flavored oil (such as vegetable oil, coconut oil, olive oil, etc.)
- 2 large eggs
- 1 teaspoon vanilla extract
- 1 cup powdered sugar, for coating the cookies
Instructions
- In a medium bowl, whisk together the flour, cocoa powder, baking powder and salt until combined. Set aside.
- In the bowl of a stand mixer, add the granulated sugar and oil. Beat on medium-high speed for 2 minutes, or until the mixture is light and fluffy. Add in the eggs and vanilla, beating on medium-low speed until combined. Then gradually fold in the flour mixture, and beat on medium-low speed until combined.
- Form the dough into a large ball, and place it on a large sheet of plastic wrap. Wrap the plastic around it so that it is sealed tightly. Refrigerate for at least 2 hours (or up to 24 hours) until the dough is chilled completely through.
- Once you’re ready to bake the cookies, preheat the oven to 350°F. Line a large cookie sheet with parchment paper. Fill a small bowl with the powdered sugar.
- Remove and unwrap the dough. Then form the dough into 1-inch round balls. Dip each dough ball in the powdered sugar until it is completely covered on all sides, and then place them least 2 inches apart on the prepared baking sheet.
- Bake for 10 minutes. Then remove the baking sheet from the oven, and let the cookies cool on the baking sheet for 3 minutes. Transfer the cookies to a wire rack, and let them cool until they reach room temperature.
- Serve immediately, or store in a sealed container for up to 5 days, or freeze for up to 3 months.


I made these Christmas and everyone loved them, especially my granddaughter. These are now her favorite cookies, so I made some to surprise her with at the waterpark tomorrow and to share with her friends! Sure hope I don’t get caught smuggling them in..lol
We’re so happy they were a hit, Wanda! :)
Tried it and my hubby loved it! Since I baked this almost at bedtime, I didn’t want to taste it….might eat them all! But my husband said my mom-in-law will love them, too!….meaning?….I have to bake more to share with her tomorrow???. Trying to make points with her to be the favorite daughter-in-law.???Thanks a lot for sharing the recipe!
Thanks, Ana, we’re so glad to hear that, and we hope your mom-in-law loves them as well! :)
I have made these twice now and they get devoured every time! Everybody loves them. Great recipe!
Thanks for sharing, Karin — we’re glad you enjoy them!
I made these cookies this morning. My batter turned out the consistency of cake batter, I measured everything precisely as I always do when baking, so I added 1/2 cup more flour……there was no way I could form a ball otherwise. I chilled the batter and baked as directed. Very, very yummy. I’m curious as to how oil and sugar actually get fluffy when beaten together? I think that is the problem, not the amount of flour. I could’ve beat the sugar and oil for 10 minutes and it would not be fluffy. But….yummy cookie.
Hi Linda! We’re sorry for just now getting to your comment, and we’re sorry you had trouble with the dough! You want the butter and sugar to be pretty fluffy, so it does sound like they needed to mix a bit longer.
UPDATE: These cookies are delicious!! Despite not being able to form a true ball for the fridge, once removed, it was formed enough to be able to shape the individual cookies for baking. I went with the suggestion to roll in a mixture of cocoa powder and powdered sugar and will do so each time I make them from now on. Yummy!!!
Thank you, Shannon — we’re so glad you enjoyed them!
I just finished washing up and the dough has been in the fridge for just 15 minutes so far. Looking forward to baking in a few hours. Like many others, my “dough” was also sticky and more like a thick batter straight out of the mixer. I triple checked each step as I went after having read comments BEFORE I began. I wasn’t able to form into a ball for the fridge but i poured the thick sticky batter onto plastic wrap, fashioned it into a pouch of sorts and we’ll see what happens in a few hours. Looking forward to tasting these!
I too could not get my dough to form into a ball so I just kept it in a bowl while it chilled. I measured the ingredients according to the recipe. I agree 10 minutes was too long to bake . Although they still tasted great!
Hi Debbie! Yes, sometimes you need to chill the dough a little longer for these to be easier to work with. We’re sorry they were a bit overbooked — we’ve tested them many times and 10 min is the magic number for us, but each oven is different! Next time maybe set your timer for 8 min and check every min. after that. We hope that helps!
Thank you sooo much for this recipe! I made it in less than an hour. My husband and daughter enjoyed it so much.
You’re very welcome, Pauline — we’re so glad you and your family enjoyed them!
hi
i was just wondering do we have to use dutch process cocoa powder , or can we use herseys cocoa powder
thank you for your response
nathalie
These cookies were easy to put together, but for some odd reason half the batch came out super bitter and I have no clue why. Going to have to try them again and maybe roll them in more sugar or something. Also, 10 minutes was way too long, next time I will bake for 5-6 mins only. Thanks for sharing.
Uh oh, it sounds like one of the ingredient measurements was off because these should definitely not be bitter :( We’re sorry these didn’t quite work out!