This post for DIY corkboard map contains affiliate links.
My husband and I married young. I remember in those sweet months before we were married getting comments like “Well kiss your freedom goodbye!” or “Don’t you wish you would have seen the world?” These comments always through me off guard a bit. You see, to me marriage is one of the greatest journeys a person can take in their life. I have always seen marriage as more of a freedom when it comes to traveling. I truly believe if I wasn’t married I would probably have traveled less than I do now. Tanner has pushed me to try new things, explore different places and love new experiences. Before we were married we dreamed of the places we would see together and the people we would meet. We have grown together and learned more than we could have imagined through our love of travel.
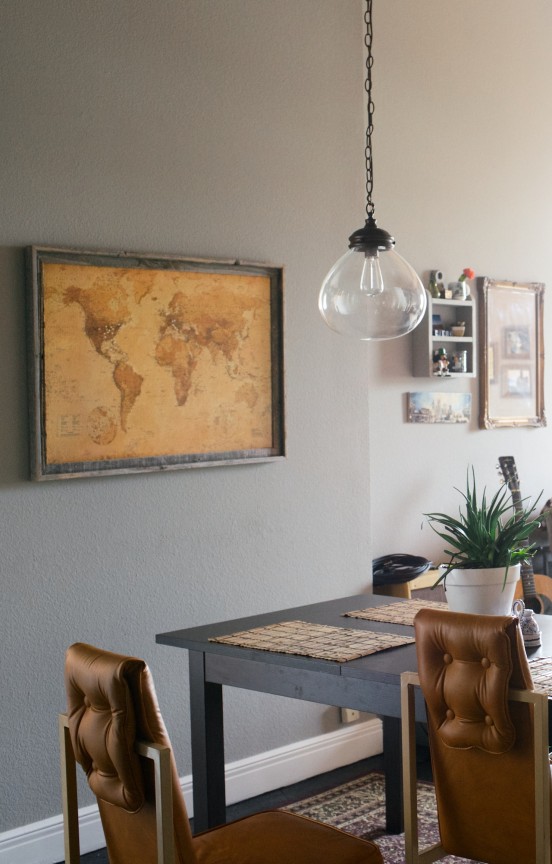
A few Christmas’s ago, when I realized that traveling was most likely going to be a very important part of our lives, I made a cork map for Tanner. It has become one of our favorite pieces of art in our home. Sometimes at dinner Tanner and I will talk about all the places we would love to see someday and I immediately get up and look at our map. It is a great reminder of how big the world really is. There is so much to see! Someday I hope it will be full of pins!

What you’ll need:
- Poster Map
- 24×36 frame–no glass (mine is from hobby lobby)
- Cork board cut to 24×36
- Modge Podge
- Pins
What you’ll do:
- Purchase your map that you would like to use. I wanted mine to have an antique feel. I ordered it off of Amazon.com and it cost me a little over $5.00. Prior to modge podge the map had a very shiny cheap look to it. (It is just a standard poster) The modge podge + cork board really transformed the look of the poster!
- Take you map and modge podge it to the piece of corkboard. I bought my corkboard at a hardware store and had them cut it to size.
**I found that creating a sticky surface before putting your poster down is best. The cork really absorbs the glue so you want to make sure the cork is tacky to the touch before you put the poster down. - Stick your poster to the corkboard and put two layers of modge podge over the poster letting it dry completely between coats.
- Since this was a Christmas gift I chose to have my map framed professionally at hobby lobby.
- Determine your pinning system: I chose to only pin places we have been together. Since this was a documentation of our travels together that just seemed like the right choice for us. I then marked our home with a yellow pin and all of our travels with white pins. Someday I would love to add a new color when we have children! :)


This map has become such an important piece of our home. One of my favorite things to do after getting home from a trip is to add a new pin!


I think Veda’s goal in life is to be apart of all of my blog posts :)


I’m excited to pin up the West Coast after our trip in the fall! Portland and Cali here we come!
Quick question: What type of Modge Podge did you use? Gloss? Satin finish?
Jessica,
I used a satin finish… I was afraid the gloss would be too shiny. I think the satin turned out perfect–it still gave off a nice shine but didn’t over gloss the poster. :)
Great project and classic look. Be sure to add the Lake Chapala, Mexico area to your wish list. We live here and it’s paradise. Don’t believe all the stuff you read in the news!
This is awesome! How much would it cost me to get it framed at Hobby Lobby if I decide to replicate this?
Jessica, If I remember right it was about 10 dollars to get it framed. Not too bad! :)
Do you put a layer of modge podge on the cork board then put the map over it and then do two more layers of modge podge??
Tina,
I put a layer of modge podge onto the corkboard and let it soak in and almost dry, then put one more layer on after that to make sure it was extra tacky. I then put the map over it and added two more coats. Since you are applying the modge podge onto a porous surface it is better to add a second layer. :)
Such a cute idea- totally doing this! Just curious how thick was the cork board you used? Minnesota DESPERATELY needs a Hobby Lobby!
It wasn’t very thick at all, maybe 1/4inch? Just thick enough to stick a pin through it! I don’t know what I would do without Hobby Lobby! Hopefully one will get to you soon!
Love this idea!!
I love this idea! We have a HUGE map in our basement – well 2 actually. One of the US and one of the world since I’ve done a lot of travel abroad. For now they’re just taped to a giant piece of cork board but I love the idea of modge podge. We have different color pins for myself, the hubs, trips together (as just a couple), and trips as a family (now that we have 2 girls). Heck, even the dog has his own pin color (course he’s only been to 2 cities…).
Oh man I forgot about our dog! Maybe she can get a color… she doesn’t get out much though :)
Looks great! We just did this project in our house and I LOVE it! I am super excited to fill it up more now! I also blogged about it here: https://lovinghere.com/diwyatt-custom-framed-map-pinboard/
Love it! I really want to do this! I’ve thought about doing a color for each of us separately, too. Because he’s been to cooler places than me (cough.. SOUTH AFRICA..cough)!
Seriously so cute. Great idea for adding a different color when you travel with kids! Get on it ;).
So, so, SO cool! Love the idea of adding a different color when you have kids.
Thanks Rachel! :)