This post for DIY corkboard map contains affiliate links.
My husband and I married young. I remember in those sweet months before we were married getting comments like “Well kiss your freedom goodbye!” or “Don’t you wish you would have seen the world?” These comments always through me off guard a bit. You see, to me marriage is one of the greatest journeys a person can take in their life. I have always seen marriage as more of a freedom when it comes to traveling. I truly believe if I wasn’t married I would probably have traveled less than I do now. Tanner has pushed me to try new things, explore different places and love new experiences. Before we were married we dreamed of the places we would see together and the people we would meet. We have grown together and learned more than we could have imagined through our love of travel.
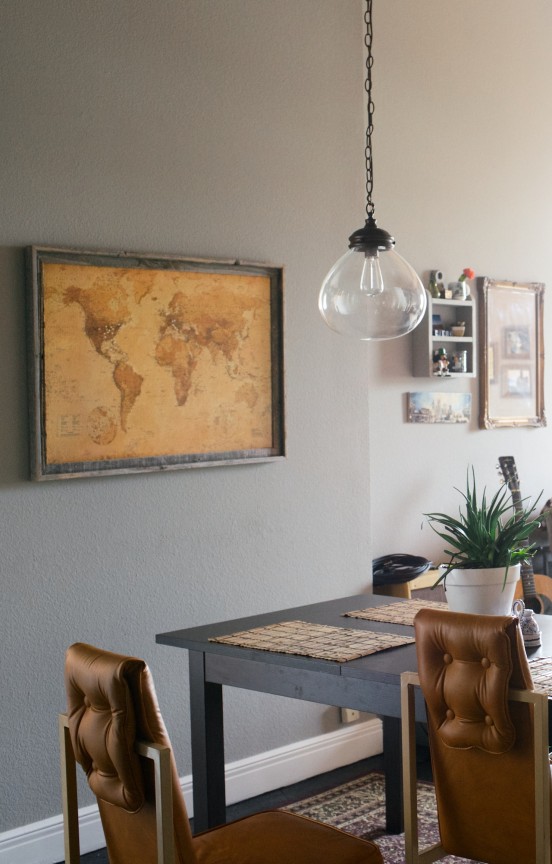
A few Christmas’s ago, when I realized that traveling was most likely going to be a very important part of our lives, I made a cork map for Tanner. It has become one of our favorite pieces of art in our home. Sometimes at dinner Tanner and I will talk about all the places we would love to see someday and I immediately get up and look at our map. It is a great reminder of how big the world really is. There is so much to see! Someday I hope it will be full of pins!

What you’ll need:
- Poster Map
- 24×36 frame–no glass (mine is from hobby lobby)
- Cork board cut to 24×36
- Modge Podge
- Pins
What you’ll do:
- Purchase your map that you would like to use. I wanted mine to have an antique feel. I ordered it off of Amazon.com and it cost me a little over $5.00. Prior to modge podge the map had a very shiny cheap look to it. (It is just a standard poster) The modge podge + cork board really transformed the look of the poster!
- Take you map and modge podge it to the piece of corkboard. I bought my corkboard at a hardware store and had them cut it to size.
**I found that creating a sticky surface before putting your poster down is best. The cork really absorbs the glue so you want to make sure the cork is tacky to the touch before you put the poster down. - Stick your poster to the corkboard and put two layers of modge podge over the poster letting it dry completely between coats.
- Since this was a Christmas gift I chose to have my map framed professionally at hobby lobby.
- Determine your pinning system: I chose to only pin places we have been together. Since this was a documentation of our travels together that just seemed like the right choice for us. I then marked our home with a yellow pin and all of our travels with white pins. Someday I would love to add a new color when we have children! :)


This map has become such an important piece of our home. One of my favorite things to do after getting home from a trip is to add a new pin!


I think Veda’s goal in life is to be apart of all of my blog posts :)


I’m excited to pin up the West Coast after our trip in the fall! Portland and Cali here we come!
I purchased all the supplies to make this and I was so excited to start when they all arrived in the mail! Unfortunately, I tried three times to get the map to be bubble free. It had no problem sticking but I just couldn’t get the bubbles out. I was trying to smooth them out with a cloth and then the map ripped right on top of Australia. :( I am so bummed out! I will be trying this again, any advice for avoiding bubbles?
Danielle,
I’m sorry you are having trouble with the map! It was tricky for me as well to get it smooth. Something I have done before when trying to get bubbles out of something is to use a credit card and gently smooth the bubbles out using the edge of the card. Let me know how that works!
Liz,
Thank you so much for responding! I have purchased a small decoupage roller and a smoother and purchased another map. I am so excited to give this a try again! I will let you know how it turns out :)
A trick I used to get the bubbles out was to use a warm (not too hot) iron to smooth them out. Seemed to soften the glue enough to help it stick better too.
Hi Liz, thanks for sharing this DIY project! What did you use to apply the Mod podge?
Hi Rachel! I just used a regular paint brush… a sponge roller would work great also!
So…I applied the map the other night and it went pretty well. I ran out of mod Podge and I sealed it today two days later and now it bubbled up on me. I can’t win I have failed 3 DIY projects in a row
What kind of cork board did you use when you framed it? The think flexible or thick board?? And do you know what frame you used at hobby lobby? I really like yours!
Let me know ASAP!
Thank you! Love your idea!!:)
Did you purchase the frame at hobble lobby as well?
Yes I did! Gotta love hobby lobby!
I have finally gathered all the materials to start this project- I even found the exact frame at Hobby Lobby! I was planning to put the frame on myself, but realized there must be a stiff backing on yours?? How did they keep the cork board firm enough to fit inside the frame without lilting over? Is it attached to a board on the back?
I am so excited to put this together! Thanks for the wonderful idea!
Lisa,
I had mine framed at hobby lobby. They put a backing on it and everything for only about 10 dollars!
Love your story and this great idea! I plan to do this for my daughter, who plans to marry at the nice young age of 20:)
I am going to make this for my husband for Christmas! Was the map you bought glossy already? I’m trying to decide between laminated or plain. Also, what does the modge podge look like when you put it over the map? Is it still easy to push the pins in?
Thanks!
Dee,
The map was just a standard semi-gloss poster paper. If you are going to modge-podge it I wouldn’t use a laminated paper because I’m not sure how the modge-podge would take to the lamination. The modge-podge gives it a matte to semi-gloss texture and is very easy to push the pins through. I have been hearing that people are having trouble getting their poster to stick to the cork. I had that same issue so make sure that when you spread the modge-podge onto the cork you let it get a little tacky before you press the map down onto it and then seal the map with a couple coats of modge-podge. Let me know if you have any other questions! :)
I am absolutely in love with this idea but I am so nervous to do it at the same time. I’m attempting it with one of each product (I know, horrible last minute idea) as a gift for my husband and I’s best friends. Wish me luck and thanks for this, Liz!
Liz,
Help! How did you keep the map from bubbling all over? My first attempt looked pretty terrible. Did you let both coats of modge podge dry almost completely on the cork board before applying the map?
Lindsey,
Mine bubbled up too the first attempt! I thought it was ruined but I carefully pulled the map off and let the modge podge become tacky to the touch and then put down another coat onto the cork and laid the map down again. I had to smooth it down carefully but it did get smooth! Once you get it on there the way you want go ahead and seal it one more time with another coat of modge podge! It does end up working, it is just hard to get that cork saturated enough to coat it. Let me know if that helps!
Did you seal the front right after you got it to tack onto the cork or did you let the cork paper dry completely before putting on the top coat?
Lisa,
I let it dry at least to the touch before I put the top coat on. Let me know if you need anything else!