This post for DIY corkboard map contains affiliate links.
My husband and I married young. I remember in those sweet months before we were married getting comments like “Well kiss your freedom goodbye!” or “Don’t you wish you would have seen the world?” These comments always through me off guard a bit. You see, to me marriage is one of the greatest journeys a person can take in their life. I have always seen marriage as more of a freedom when it comes to traveling. I truly believe if I wasn’t married I would probably have traveled less than I do now. Tanner has pushed me to try new things, explore different places and love new experiences. Before we were married we dreamed of the places we would see together and the people we would meet. We have grown together and learned more than we could have imagined through our love of travel.
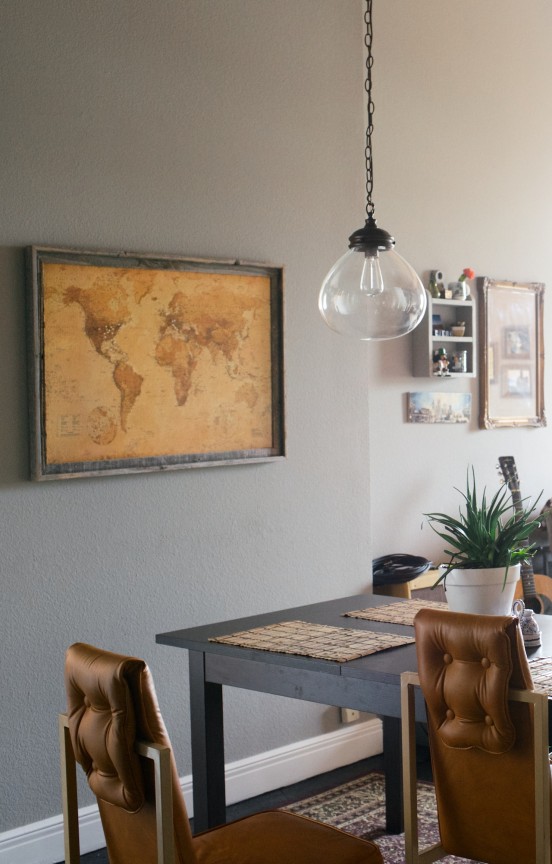
A few Christmas’s ago, when I realized that traveling was most likely going to be a very important part of our lives, I made a cork map for Tanner. It has become one of our favorite pieces of art in our home. Sometimes at dinner Tanner and I will talk about all the places we would love to see someday and I immediately get up and look at our map. It is a great reminder of how big the world really is. There is so much to see! Someday I hope it will be full of pins!

What you’ll need:
- Poster Map
- 24×36 frame–no glass (mine is from hobby lobby)
- Cork board cut to 24×36
- Modge Podge
- Pins
What you’ll do:
- Purchase your map that you would like to use. I wanted mine to have an antique feel. I ordered it off of Amazon.com and it cost me a little over $5.00. Prior to modge podge the map had a very shiny cheap look to it. (It is just a standard poster) The modge podge + cork board really transformed the look of the poster!
- Take you map and modge podge it to the piece of corkboard. I bought my corkboard at a hardware store and had them cut it to size.
**I found that creating a sticky surface before putting your poster down is best. The cork really absorbs the glue so you want to make sure the cork is tacky to the touch before you put the poster down. - Stick your poster to the corkboard and put two layers of modge podge over the poster letting it dry completely between coats.
- Since this was a Christmas gift I chose to have my map framed professionally at hobby lobby.
- Determine your pinning system: I chose to only pin places we have been together. Since this was a documentation of our travels together that just seemed like the right choice for us. I then marked our home with a yellow pin and all of our travels with white pins. Someday I would love to add a new color when we have children! :)


This map has become such an important piece of our home. One of my favorite things to do after getting home from a trip is to add a new pin!


I think Veda’s goal in life is to be apart of all of my blog posts :)


I’m excited to pin up the West Coast after our trip in the fall! Portland and Cali here we come!
Hi
I absolutely love this map idea! I am just about to start my travels around the world and want to create this map. What kind of finish Modge Podge did you use? I checked out their website and there are loads of different types!
Thanks so much – and thanks for such a great idea!
Samm
Love this. Bought my stuff a few months ago and finally did it tonight. I bought the map from amazon as suggested and a roll of cork as well (both super cheap). Here are my tips: The spray Modge Podge does NOT work to stick the map to the cork board. You have to use the regular glue like one (matte finish). Use a credit card to smooth out the bubbles.
I left the glue absorb a few minutes on the cork the stuck the map on. I let it dry a little and then I applied the first layer of mode lodge over it using a fat craft paint brush. I advise to just use a good amount-don’t try to spread it too thin or it will get tacky and you can rip the poster. Don’t touch the poster as the glue is drink. i did in one spot and the paper stuck to my fibers making a rip. (Its okay- it added to its authentic aged look.) Don’t worry that the mode lodge looks like its gong to leave a white finish-it doesn’t. It dries clear.
Let it dry a few minutes then apply the second coat.
I really don’t recommend the spray mode lodge. I tried it and felt it didn’t create the aged look we are going for here. It also really stinks and you have to open the windows. The glue version has very little smell.
I will post a picture soon once I pin and frame it!
Sorry not Lindsey but Liz! :S
Hi Lindsey,
I am in the process of buying the supplies to make this really nice DIY map. :) However, I have two questions for you:
– The cork board that you used, was it flexible (like a roll of cork board) or like a rigid board?
– Regarding the bubbles, you said in the posts that when you thought your map was ruined, you carefully pulled the map off and let the modge podge become tacky to the touch and then put down another coat onto the cork and laid the map down again. When you applied the second coat of modge podge, did you wait for it to become tacky again before laying the map down?
Thanks in advance !
Hi there:
Thanks for posting this! I, like many others, completed this on my second attempt. Yes, round 1 included a crease, followed by an attempt to smooth, which resulted in a rip.
Alas, I have a recommendation for those who experienced bubbling/creasing after the application of Mod Podge on the front of the map…instead of using the original Mod Podge by brushing or rolling onto the map, use the Mod Podge spray acrylic sealer! This results in a smooth application. No overly wet sticky map, no bubbles, no creases! Results in a perfect map with the perfect look – voila!
Liz! I am about to try this amazing DIY! Wish me luck :)I read through all the comments, so that should be very helpful! ~
I am super excited. I have always wanted a map for my home. I happen to have a hobby lobby near my home. I took the map to them and they took care of attaching the map to a foam board except it had a few bubbles. I was told that the machine malfunctioned. They kept the map and are going to try to fix. I may need to purchase a new map though. Will foam board work just as well as corn board? All I would need to do is as the layer of modge podge to the map. I also found a nice frame that compliments the poster. I am hoping they can fix it for me. Thanks for sharing!
Love this. Was the frame one they sold or did they build it for you? There is no hobby lobby by me in NY. I thought I could order it order from them online but I don’t see ANY frames 24×36. I could buy another frame elsewhere but I love that old look. Do you know what the name of the frame was? Maybe I could call a store and ask them and have it shipped. Thanks!
Hey! I’m not sure what the name of the frame is, but I can check it out the next time I’m at hobby lobby. Michaels also has a gray wash frame collection as well if there is one close to you!
Beautiful! Did you by chance find out the name of the frame? I found one at hobby lobby called the “Barn Wood Open Frame.” Is that it or was it a different one? I love that frame!
That’s the one!
I love this! I already bought the map you recommend. This will be an amazing anniversary gift for my husband. I have to ask, is that frame one that you purchased at Hobby Lobby also? It is so similar to the frames we already use in our home and I’d love to stick with that style.
Hi Crystal! Yes the frame is from hobby lobby. They have them in all different sizes! :)
I LOVE LOVE LOVE this – the look of the vintage map, and the frame style are exactly what I am looking to replicate! Two ?s:
1) the image above of Modge Podge is the matte finish. do you recommend the satin finish? is 8 oz enough or do i need 16oz size?
2) I can’t seem to find that frame on hobby lobby’s website. do you happen to have a link for it?