For years, readers and bloggers have asked me about my shooting setup. And I always tell them that it’s nothing fancy. (At least, nothing fancy like some of the professional studios I have worked in with food styling.) However, I think that’s what I love about food blogging. There are hundreds of food bloggers around the world who are taking amazing photos…with very minimal studios and equipment…which I think is awesome.
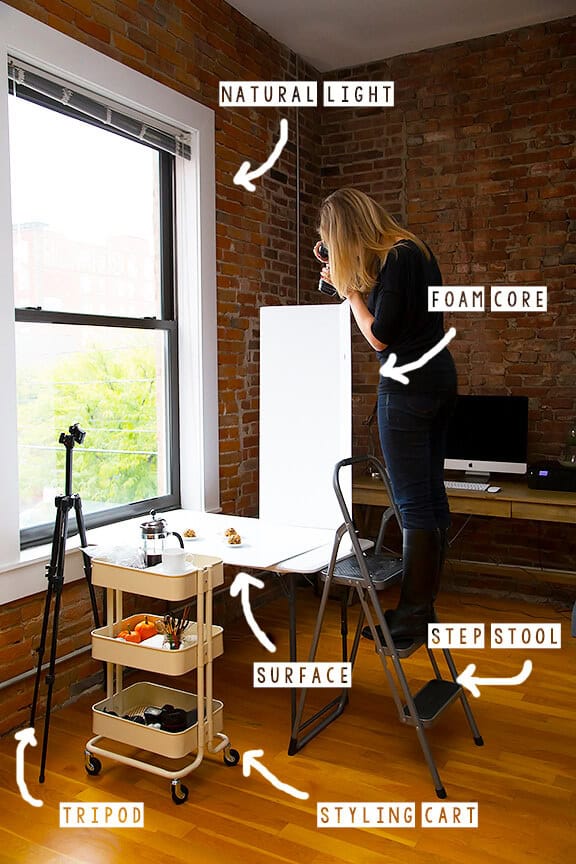
So for anyone who’s interested, here’s what my home shooting setup looks like. I live in a loft in downtown Kansas City that I chose because it has big windows. But don’t be fooled by that light — I bumped up the exposure on this pic (as I do on almost all of my pics). With the exception of about 3 hours of the day, the lighting in my place is actually not ideal. Often times, it is not that bright, based on various shadows that come in from trees and buildings. And the curse of living in a place with all of my amazing brick walls is that when the light is shining in my loft, often times I’m seeing red. Red. Red. Red.
So I shoot between about 2-5pm most days when the light is a little cooler in tone, and not crazy bright and casting red hues everywhere, and hopefully my food is cooked and timed right so that it’s ready to go. A part of me definitely wishes I had more hours in the day for shooting. (And yes, I have tried all kinds of artificial lighting and still can’t beat the sweet light that comes in that big window during that small window of time.) But no complaints. I love my loft and I love getting to shoot at home, so I’m sticking with it.
As for my setup, here are my basics:
Surface: I shoot on a $30 folding table I purchased at Target that has adjustable height, although I prefer it at window height for lighting. Most of the time I shoot on a white piece of foam core (which I replace regularly due to spills and stains), but I also have a handful of other wooden and metal surfaces that I keep nearby. Most of the time, I shoot my subject (i.e. food) a foot or two away from the window, depending on the time of day and how bright it is outside. And most of the time, I shoot backlit.
Tripod: You can learn more about my specific tripod in my post about My Camera Accessories. But the tripod most often goes in the place of the step stool when I’m not standing on it, when I’m shooting backlit.
Styling Cart: This cart was a recent purchase from IKEA which (finally!!!!) came to Kansas City this month. I know that Pinterest says you can do a million things with this cart. I use it as my portable styling cart with any ingredients or supplies I may need nearby. I will be sharing about my specific food styling tools in an upcoming post. (Stay tuned.)
Step Stool: Best $25 I have spent in the last year. Oh man, I used a little kids’ bathroom stool for years, which increased my ability to shoot overhead a bit. But I finally picked this step stool up at Home Depot a few months ago, and I now use it almost every single day. It’s super sturdy, and I love it. (Also good for reaching the top cabinets in my kitchen!)
Foam Core (Reflector): I own a handful of real reflectors, but use this recycled (a.k.a. food-stained) $5 piece of foam core board that I scored and folded down the middle as my main reflector for shooting. It is essential for bouncing the light on the front of my subject when I’m shooting backlit. And if it isn’t enough, often I’ll hold or setup a second reflector on the left/front side of the food as well to help light a certain part of the subject. I have a handful of these folded foam core boards in different sizes too that are the cheapest, easiest reflectors I’ve found.
Natural Light: Finally, as I’ve said, my natural light source is this window. I kept the cheap blinds on it because they actually do a fantastic job of shaping the light while I shoot (i.e. making things darker or lighter). I also have some of those cheap sheer white sheer curtains that I sometimes put up on the window to diffuse the light. But honestly, those little white blinds do wonders.
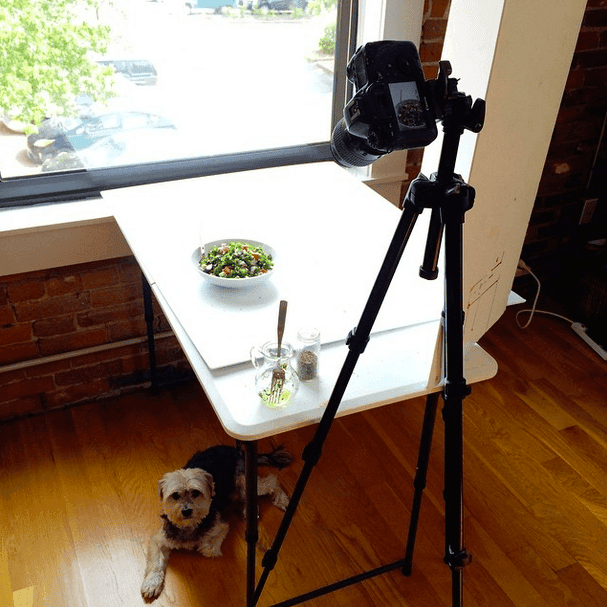
Oh, and I can’t forget to give a shout out to my trusty assistant who sits under the table during all shoots — my crumb-catching, sun-bathing, power-napping, tail-wagging pup, Henry. He’s the best part about working from home. :)
I like cooking, but I will learn your technique.
Nice tips Ali.
I like your technique in taking pictures of food.
I will learn it because I also have a food blog.
Super helpful, thanks for the tips. Need me one of those stepstools :)
I’m so happy I popped over here & started exploring around. I needed a visual os someone’s set up do bad. I moved to a new house a year ago and it feels very dark to me. My photos are definitely dark because of it. It’s driving me bananas. I think I found the right window, now I need to get a set up in place. Download Video Bokep And I need a tripod (hello!). And foam core. Sheesh!! I knew all these things but I swear, it was a VISUAL that I needed most.
Thanks girl! xo
I am taking classes at the local college and love to take pictures of food and products. I love all the little ideas that you gave
That’s awesome! And we’re glad you found this helpful! :)
Hi Ali, thank for sharing this, really inspiring.
I have a question, for foam core / reflector, do that necessary? Is there any big different with and without?
Hey Masakan! Oooh yes, I’m a big believer in having the reflector. It makes a huge difference in being able to bounce and control the light on your subject, especially if you’re shooting backlit. If I didn’t use the reflector, the front of the food would be super dark and shadowy. So even if you just use a white sheet of typing paper, it really can make a big difference!
Nice share and nice info, I want do it For take a pictures for my website
Nice!! Thank you for sharing! It was really helpful.
Awesome, we’re glad to hear that! :)
Thank you so much for sharing! I’ve been researching and preparing to start my own food blog in the future, and this post is very informative. It really got my mind churning for creating my own setup, and I love that you point out inexpensive items that are very accessible. Thanks again!
I really really want to try to work on recipes, and this is very helpful! I will definitely try these tips.